![]()
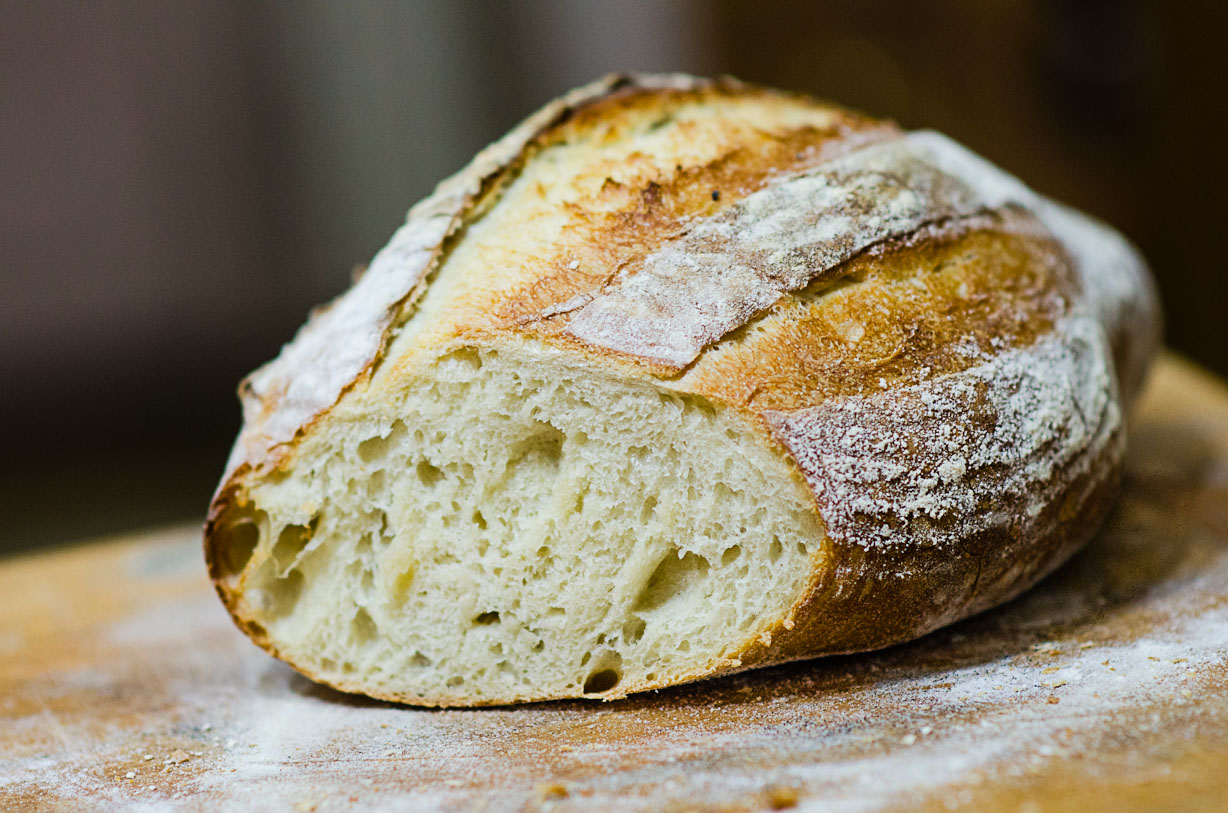
You’ve baked your first loaf of bread. It was good. It was clearly better than store bought bread. But—you know it could be better. It just wasn’t quite there, yet. So where do you go next? The answer is steam. Adding steam to the oven is transformative: loaves rise, crusts brown and crackle, and baby unicorns take up residence in the open crumb. (Ok, maybe not all of that happens, but trust me, it’s good.)
What does steam do for bread? Primarily, it gelatanizes the starches in the crust and keeps them that way longer. This causes the outside of the loaf to form an extended, flexible “skin.” Think of the flexible skin as the outside of a balloon and the yeast inside the loaf of bread are blowing the balloon (loaf) up. This causes the skin to stretch and get thin. As the steam goes away, the thin skin finally hardens into a crispy, thin crust. Further, some of the starches in the crust are broken down into simple sugars that caramelize and cause additional browning.
So what happens without steam? The outside of the loaf cooks and sets quickly, forming a hard, thicker crust. It can’t stretch and so it stays thick. This may also inhibit the rise of the loaf. Instead of a balloon, its now a coconut. You could stick a straw in a coconut and blow as hard as you want, but its not going anywhere. If instead you used an air compressor? Crack! Same thing with bread and a hard crust. If it tries to rise enough, but can’t swell, you get a crack:
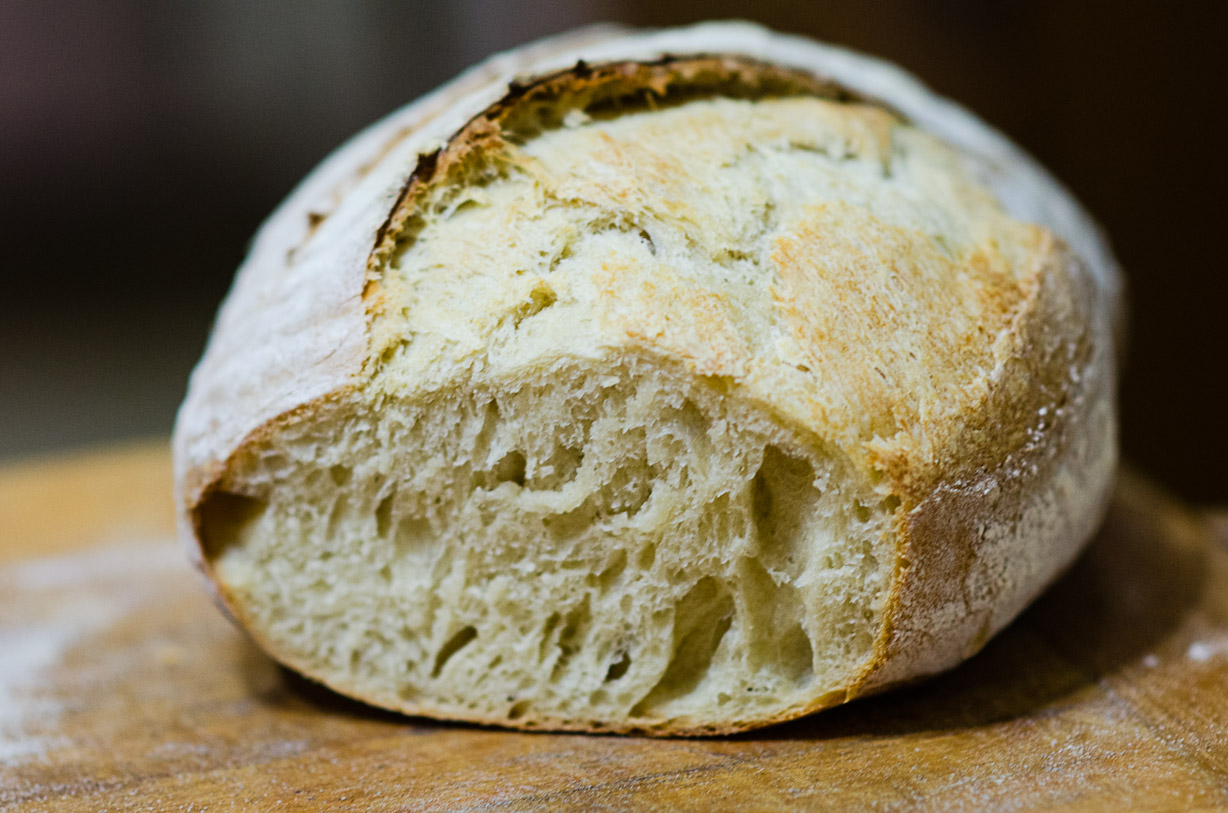
Instead of the uniform lines of the first loaf, we’ve got one giant crack. These loafs were mixed, folded, shaped, scored and baked identically—the only difference was the steam. See the lighter color? No steam. You want steam.
So, how did I get steam?
This is how:
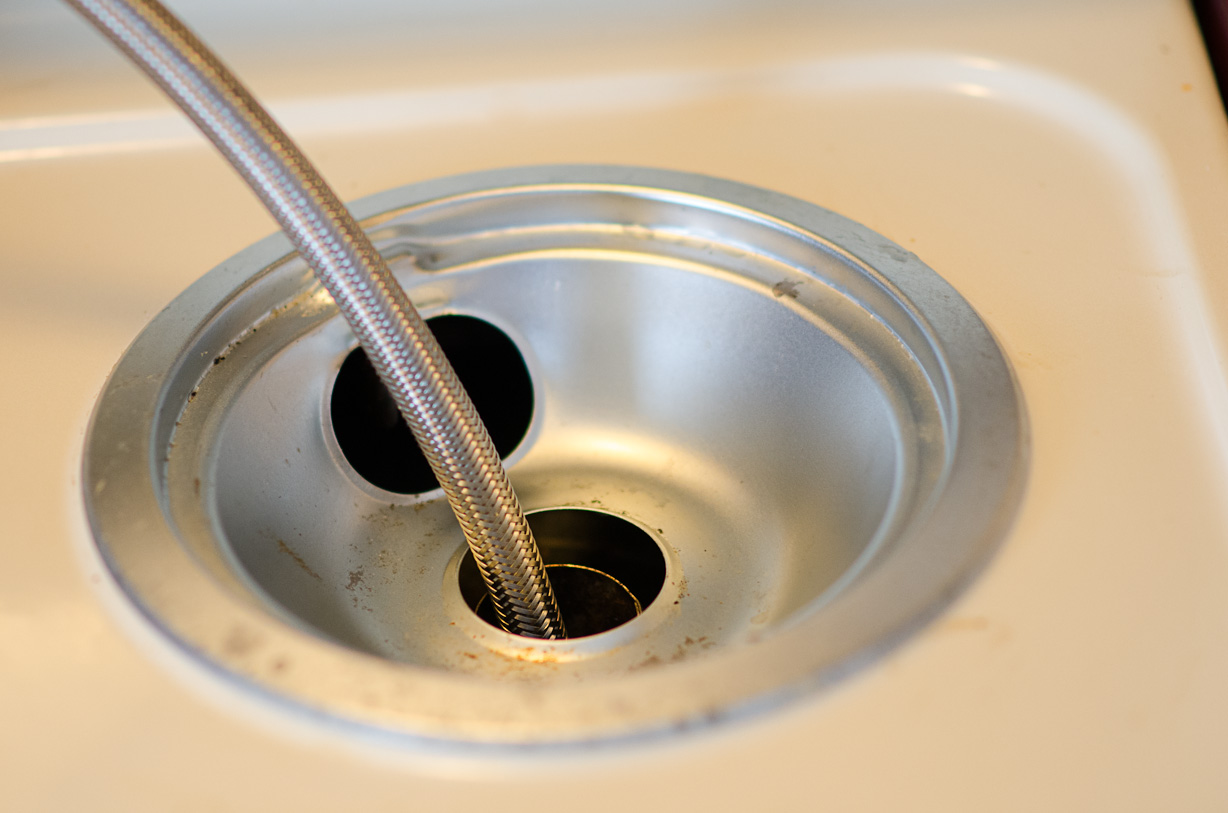

What the heck is that? That is a pressure cooker modified to inject steam into the exhaust output of the oven. Wait—did I just say “pressure cooker modified”—isn’t that dangerous‽ Not if you’re careful. Don’t leave the valve closed for more than a brief period. Further, the safety valves are still intact—if pressure builds, the rubber button on top pops off and releases the pressure. Just keep your face out of the way.
The pressure cooker is a jiggle top model (particularly the Cooks 8 Qt from JC Penny). I removed the jiggler and fit a valve and steel braided hot water line to the top of the pipe that held the jiggler. The pipe already had a thread on the end of it, so it was just a quick trip to the hardware store for some appropriate piping and strange looks from the store employees. The valve is optional, but without it when you open the oven door, you’d get a face full of steam. Close the valve, load the bread, open the valve—no missing eyebrows from a blast of fresh steam. As for the actual process, simply load it with water, turn it on high, and feed the hose down into the stove (I did this on an electric oven, where the vent is less than full oven temperature). Voila – steam. Shortly after, expect steam to start pouring out of any leak out of the oven. I recommend letting the oven fill with steam for a few minutes before loading the oven. The humidity in the oven will recover faster after you open the door.
So, why choose this method over other methods like steam pans, lava rocks, ice cubes, water spritzes, or dutch ovens? Total, continuous control. The steam will run full blast for as long as you want it and only for when you want it. Steam pans and steam pans with lava rocks must have a correct amount of water as well as the right surface area ratio. Too much water and it steams too long. Too little and the effect doesn’t last. The wrong surface area means that steam isn’t generated quickly enough. Ice cubs and water spritzes are just terrible. They provide just a tiny amount of steam at the very start. It’s effectively nothing. Dutch ovens are great—they use the bread’s own water vapor to gelatinize the crust. Where do they fail? When you don’t want dutch oven shaped loaves!
So there you are—hack a pressure cooker, take your bread to the next level. In a future post, we may cover examples of loaves from each steam production method. Happy baking.
Tagged: bread, pressure cooker, steam
Great article! I am looking at the adapter between the top and the valve and seeing a lot of Teflon tape. Would you add a shot of the disassembled components? Or maybe a diagram? I don’t want you to ‘tear apart’ what you have, but if you could give a better idea of the connection I would appreciate it.
Truth be told, its a bit of ‘whatever fit’. I had a fixed size to start (the thread at the top of the pressure cooker), a fixed size at the end (the hot water line), and a few options for the valve in the middle. It was at the hardware store that I just started looking at brass fittings until I got the smallest bit of pieces that all connected together. The order is pressure cooker ‘stem’, coupler, valve, coupler, and hot water line.
This is an interesting read! I have to admit that I use a sunbeam bread machine to make my breads, so I’m not sure how I’d retrofit this idea properly. All the same, pretty awesome.
Just put a skillet with boiling water inside the oven when baking the bread! Have been doing that for years and works perfectly!
It’s truly not the same. The output isn’t the same, the ease of use isn’t the same (messing with boiling water with a hot oven door open), the result really isn’t the same. I’ve done both…A LOT.
Or you can just leave the skillet in there while it preheats and creates steam! Is that really not easier than hacking pressure cookers and tubes and all that stuff?
Do you add steam for a long time?
Sounds good. I’m ready to try it.
Can you give me some idea about the timing: you mention you can turn the steam on for a time then turn it off when you want to.
OK, so when do you turn it on and when do you turn it off? How do you know when to turn it off?
Does using the steam modify the time it takes to cook the bread? Does it modify the temperature at which you bake the bread? Or do you follow your recipe and past experience, just adding the steam for a certain number of minutes?
If this is different than a pan of boiling water in the oven, how is it different and how does the bread come out different each way?
Well it really depends on the bread. For many of my breads, I usually steam for the first ten minutes at 500 F. Turn off the steam, turn the oven down to 375F, open the door for 2 minutes, close the door and bake for 20-25 minutes.
The article talks about the pans of water. Basically you’re talking about more steam, about getting the oven hotter because you’re not using its heat to make steam, and the ability to stop the steam. You can over steam the bread.
I’ve thought about doing this for years… ever since I became intrigued with Leidenheimers poboy loaves.. pressure pots are easy to come by.. especially the ones without the weighted pressure caps.. without a doubt a humid baking environment is an absolute for achieving that perfect crust that seems elusive to so many. thanks for your post and pics!..
Where is the exhaust output on an oven? I am fascinated by your technique.